Ordering tags
How to order tags: select, customise, choose a quantity, order and configure in Core, with print specs, dielines, proofing and lead times.
Ordering tags takes six steps: start in the shop, pick a format, customise it, choose a quantity, order, then configure the tags in Core. This page covers each step, the print specification, artwork and proofing, and how long production takes.
How ordering works
- Start in the shopOrder in the shop, or from the calculator on Pricing on the website. The plan is billed in Core, the tags in the shop.
- Select tagsPick a format from the store: sticker sheet, on metal sticker, card, wristband, Mini CD, resin tag, garment tag or key tag.
- CustomiseUpload your artwork, and choose the finish and the tag.
- Choose quantitySet how many you need, from the format's minimum order. The price per tag falls as the quantity rises.
- OrderApprove the proof and place the order.
- Configure in CoreClaim the tag batch in Core and point it at a Portal, or at any link.
Order in the shop, or work out a plan and tags together with the calculator on Pricing on the website, which hands your selection to the shop. The plan is billed in Core and the tags in the shop. Delivery is added at checkout.
No account needed
A bespoke custom build starts with a conversation instead: see the three paths.
Order the hardware first and design against it, rather than the other way round. The build is rarely the constraint. Lead times are.
Configure in Core
Tags arrive preprogrammed. In Core, a tag batch is claimed, then pointed at a Portal. Each tag moves through a lifecycle: Manufactured, Enrolled, Linked, Claimed and Invalidated. A tag can be repointed later without reprinting.
Self serve is a beta for selected Base, Studio and Label clients from Q4 2026, with the full platform going to selected clients in 2027. Every other deployment is managed by DEPARTMNT, so the configuration is done with you.
You can claim a batch before the Portal is finished and point it at a holding page. When the Portal goes live, repoint the batch. The printed tags do not change.
What you can customise
| Option | What it covers |
|---|---|
| Full colour on every format in the matrix except the garment tag. Cards and wristband plates print on both faces. Unique ID or QR print on most formats | |
| Finish | Smooth matt, crystal matt, gloss or spot UV, depending on the format. Cards also come on black stock |
| Tag type | Standard (NXP NTAG213) or Advance (NXP NTAG424 DNA), on every format. See Tags and authentication |
| Adhesive | 3M permanent adhesive on sticker sheets. On metal stickers and resin tags take 3M 467 (metal, glass, hard plastics) or 3M 9080 (paper, board, low energy plastics) |
| Packaging | The Mini CD is printed on the disc and every panel of the insert. Other formats: to be confirmed |
The customisation matrix shows which print and finishes each format takes.
| Format | Full colour print | Smooth matt | Crystal matt | Gloss | Spot UV |
|---|---|---|---|---|---|
| On metal sticker | Yes | Yes | Yes | Yes | No |
| Sticker sheet | Yes | Yes | Yes | Yes | No |
| Card | Yes | Yes | Yes | Yes | Yes |
| Wristband | Yes | Yes | No | Yes | No |
| Mini CD | Yes | No | No | No | No |
| Resin tag | Yes | No | No | No | No |
| Garment tag | No | No | No | No | No |
The garment tag is built into the garment: the woven tag is woven in one or two colours, and the disc sits unprinted inside. The resin tag's epoxy coat is its finish.
Print specification
These rules apply to every printed format. Each format's dieline gives its exact trim, and its spec sheet gives the rest.
| Rule | Specification |
|---|---|
| File format | Vector PDF, AI or EPS. A PDF holding a photo prints at that photo's quality |
| Images | At least 200 dpi at print size |
| Colour | CMYK, with a Pantone reference for brand colours. Colour can shift on plastics, so matches are as close as each material allows |
| Fonts | Outlined. Otherwise standard or Adobe fonts, named |
| Bleed | 3 mm past the trim on every printed edge. 2 mm is the production minimum |
| Safe area | Text, logos and codes at least 2 mm inside the trim, and around holes and slots |
| Unique QR or ID | Place one sample to show the position. Send the data as a spreadsheet; each tag gets its own code. Unique QR codes use standard black square modules |
| Custom shapes | Draw the cut line on its own layer |
Antenna keep out
The tag and antenna sit behind the print. Where the antenna size is known, the dieline marks it.
| Format | Keep out |
|---|---|
| On metal sticker | 25 mm antenna in a 29 mm sticker. The barrier side goes on the metal |
| Garment tag | Disc antennas of 23 mm (25 mm disc) and 25 mm (29 mm disc) |
| Card | The tag can leave a slight dip, about 5 x 5 mm, near one corner. Keep fine detail away from it |
| Custom | Set per project. The Mulaa Joans note carried a 15 mm clear inlay in a 20 mm area on the reverse |
| Other formats | Shown on your proof |
Avoid metallic inks, foils and conductive coatings over the antenna: metal under the print weakens the read. A tap cue near the antenna shows a first time user where to tap.
Artwork and proofing
Start from the dieline for your format, place your artwork on its Artwork layer, and keep the trim where it is. The Artwork guidelines cover every step.
- Send artworkWith your order, or before it if you want a proof first.
- ProofWe check it against the dieline and send two views: Crop, the artwork with bleed and cut line at true scale, and Visual, the finished tag.
- CheckAt 100 per cent, with the dieline and keep outs visible.
- ApproveOr send changes. Each revision is numbered.
- ProductionStarts from the approved proof.
The approved artwork is a flat composite at true scale, not a render. Once approved, that file is what goes to production. A render shows how the tag might look on the object; it is not what is approved.
Proofs usually come back within one working day, and the stock lead time runs from approval.
Downloads
Spec sheets and dielines by format
| Format | Spec sheet | Dieline |
|---|---|---|
| Wristband | PDF · SVG | |
| Card | PDF · SVG | |
| Metal card | PDF · SVG | |
| Sticker sheet | PDF · SVG | |
| On metal sticker | PDF · SVG | |
| Resin tag | PDF · SVG | |
| Garment tag | PDF · SVG | |
| Mini CD | PDF · SVG | |
| Key tag | PDF · SVG | |
| Custom | PDF · SVG |
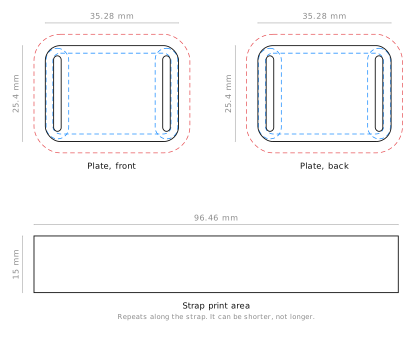
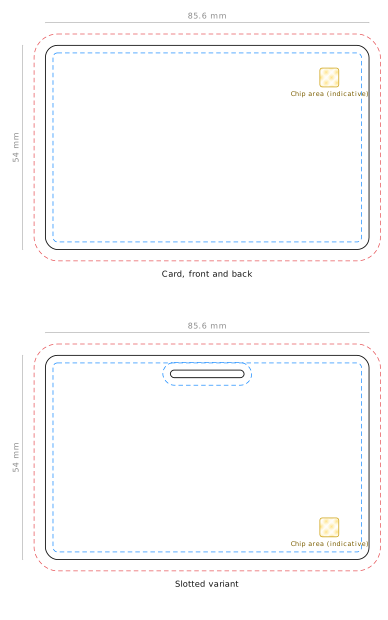
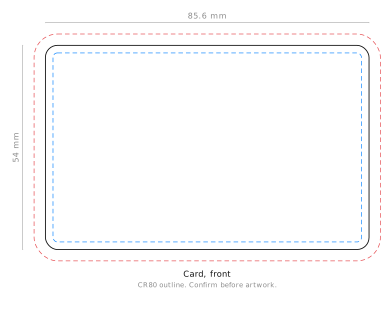
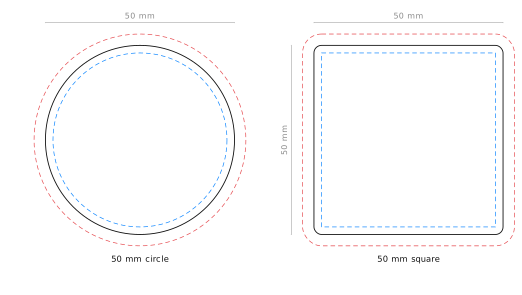
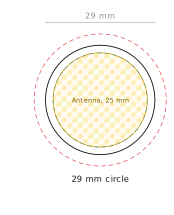
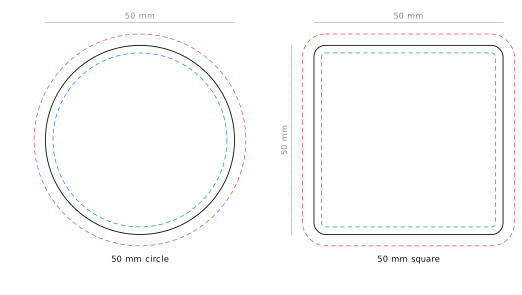
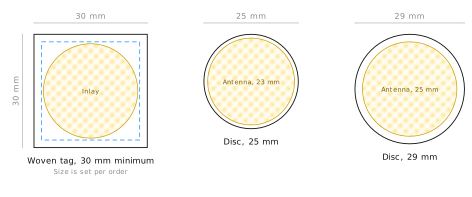
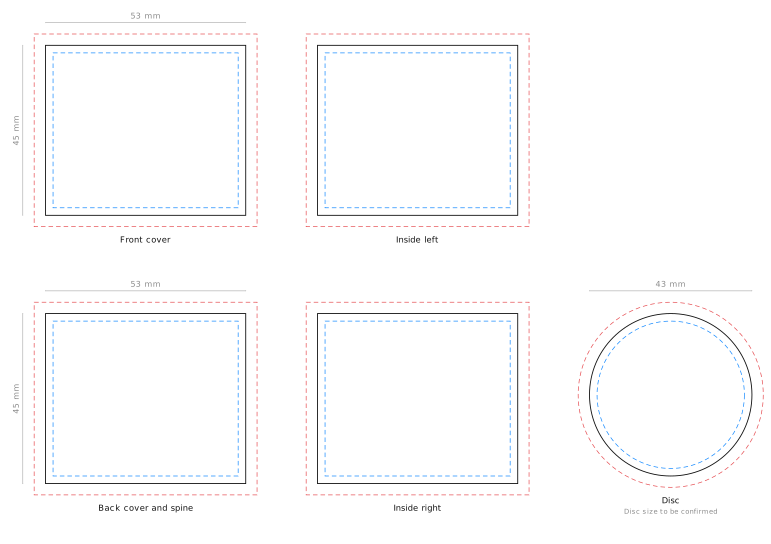
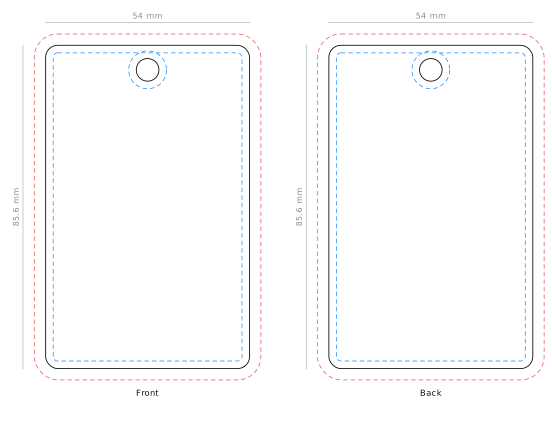
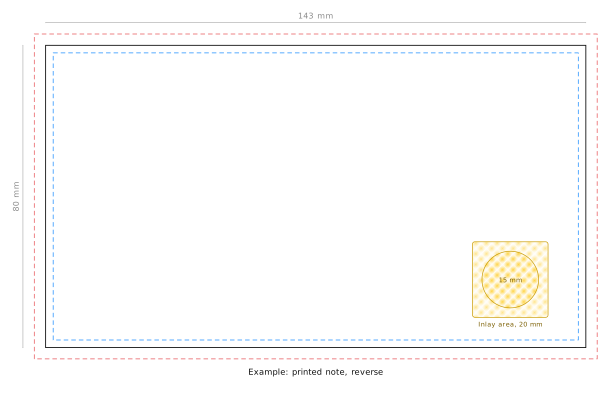
Every file is also on Downloads.
Lead times
| Format | Stock lead time |
|---|---|
| Sticker sheet | 1 week |
| Garment tag | 1 week |
| Mini CD | 2 weeks |
| On metal sticker | 4 weeks |
| Card | 4 weeks |
| Wristband | 4 weeks |
| Resin tag | 4 weeks |
| Metal card | 4 to 6 weeks |
| Key tag | 1 |
| Custom | To be confirmed |
Minimum orders
Each format has a minimum order. Bigger orders cost less per tag. From 20,000 of a format on a line, the price is on request.
| Format | Minimum order |
|---|---|
| Sticker sheet | 1 |
| Garment tag | 1 |
| Card | 100 |
| Lanyard | 100 |
| Wristband | 100 |
| Resin tag | 100 |
| Resin tag, on metal | 100 |
| Resin tag, premium on metal | 5,000 |
| On metal sticker | 1 |
| Key tag | 1 |
| Mini CD | 1 |
| Metal card | 1 |
Hardware prices and the calculator are on Total cost of ownership.
Fitting and application
The surface decides the format: use on metal tags for metal. See Surfaces.
- Stickers and resin tags. Apply to a smooth, clean surface. On metal stickers go barrier side down.
- Resin tags. Fixed with adhesive, or bolted on the larger screw hole sizes.
- Garment tags. Belong in the garment at manufacture: sewn, iron on or bonded.
- Key tags. Double keyring, steel wire, plastic cord or elastic through the reinforced hole.
- Mini CDs. Supplied individually, with no adhesive or fixing point.
The Portal design studio (the configurator) is a work in progress. It will align with phase 2 of the Portal, and Core replaces it in 2027. You can look at the current studio.